FAQS
Esbuild Related
How to use project without Scss & Esbuild ?
If you don't want to use scss files, if you want to use only css files please follow below steps.
Step 1 :
Install the SASS package using npm by running the following command:
npm install sass
Step 2 :
-
1. Open your project's
package.jsonfile. If you don't have one, you can create it by running npm init and following the prompts. -
2. Inside the
package.jsonfile, locate the "scripts" section. If it doesn't exist, create one:"scripts": { // ...existing scripts... } -
3. Add a script that specifies the compilation process from SCSS to CSS. You can name the script as you prefer, but for this example, we'll name it "sass." The script should look like this:
														  "scripts": {
															"sass": "sass ./public/assets/scss:./public/assets/css/"
														  }
In the script above, replace
./public/assets/scsswith the path to your SCSS files and./public/assets/csswith the destination directory for your compiled CSS files. -
4. Add a script that specifies the compilation compressed process from SCSS to CSS. You can name the script as you prefer, but for this example, we'll name it "sass-min." The script should look like this:
														  "scripts": {
															"sass-min": "sass ./public/assets/scss:./public/assets/css/ --style compressed"
														  }
In the script above, replace
./public/assets/scsswith the path to your SCSS files and./public/assets/csswith the destination directory for your compiled CSS files. -
5. Save the
package.jsonfile.
How to use Scss to css compilation Process?
Compiling SCSS to CSS :
With the SASS package and script configured, you can now compile your SCSS files to CSS with the following steps:
-
1. Open your terminal or command prompt.
-
2. Navigate to your project's root directory if you're not already there.
-
3. Execute the following command to run the "sass" script:
npm run sassThis command will initiate the SCSS to CSS compilation process using the SASS package.
-
4. Execute the following command to run the "sass-min" script:
npm run sass-minThis command will initiate the SCSS to CSS compilation compressed process using the SASS package.
-
5. Once the process is complete, the compiled CSS files will be generated in the specified destination directory (e.g., ./public/assets/css).
General Style
How to Change Font Style ?
Step 1:
Go To style.scss (src/assets/scss/styles.scss )
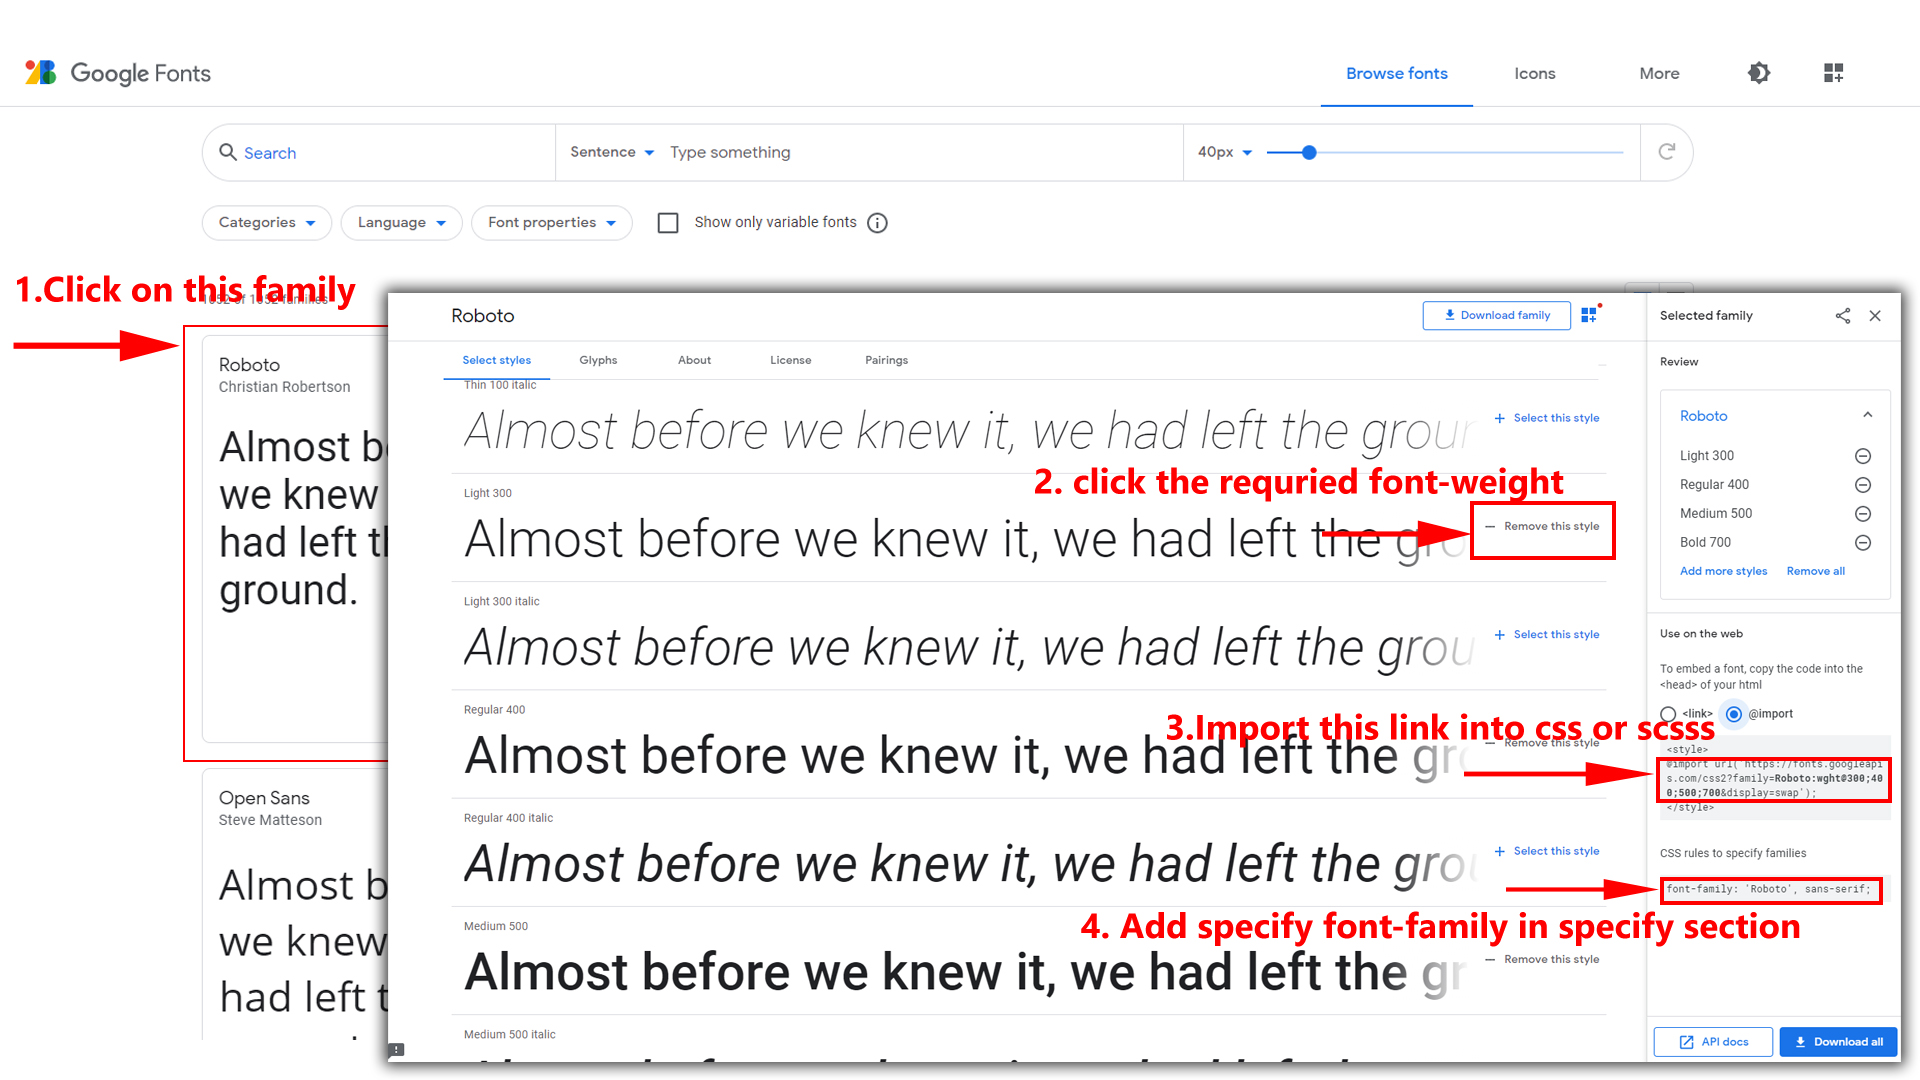
if you want to change another font-family Go to the site Google Fonts And Select One font Family and import in to styles.scss file
How to Select font Family
Example:
Step 2:
And paste Your Selected font-family in style.scss
Example:

Step 3:
And add the Your Selected font-family in _variables.scss(src/assets/scss/_variables.scss)
Example:
--default-font-family: 'Roboto', sans-serif;
How to change Menu icons ?
By default menu icons are Boxicons if you
want to change icons please follow below steps
Step 1 :
To change Menu icons, open sidebar.html page Path:src\app\shared\services\navservice.ts and go through
app-sidebar
section, in that section you will find Boxicons of menu in
i
tag, there you can replace previous icon with your icon. Example
as shown in below
How to Change Logo ?
Go To "src/assets/images/brand-logos" folder and replace your logo with Previous Logos within in image size. note: Please don't increase logo sizes. Replace your logo within given image size. otherwise the logo will not fit in particular place it srcurbs the template design.
To clear LocalStorage(cookie)
How to clear LocalStorage (cookie)?
Step1:
Open switcher.ts file
src\app\shared\components\switcher\switcher.ts
To clear LocalStorage loading functions you need to remove localStorageBackup() function in custom-switcher.ts as shown below
export function localStorageBackUp() {
															let html = document.querySelector('html');
															if (localStorage.getItem('data-header-styles') == 'dark') {
															  if (html?.setAttribute('data-theme-mode', 'dark')) {
																const light = document.getElementById(
																  'switcher-light'
																) as HTMLInputElement;
																light.checked = true;
															  } else {
																if (html?.setAttribute('data-theme-mode', 'light')) {
																  const light = document.getElementById(
																	'switcher-light'
																  ) as HTMLInputElement;
																  light.checked = true;
																}
															  }
															}

															if (localStorage.getItem('spruha-dir') == 'rtl') {
															  html?.setAttribute("dir", 'rtl');
															}
															if (localStorage.getItem('spruhadarktheme')) {
															  const type: any = localStorage.getItem('spruhadarktheme');
															  html?.setAttribute('data-theme-mode', type);
															}
															if (localStorage.getItem('spruha-theme-mode')) {
															  const type: any = localStorage.getItem('spruha-theme-mode');
															  html?.setAttribute('data-theme-mode', type);
															}
															if (localStorage.getItem('spruha-nav-mode')) {
															  const type: any = localStorage.getItem('spruha-nav-mode');
															  html?.setAttribute('data-nav-layout', type);
															  if(type == 'horizontal'){
																html?.setAttribute('data-nav-style', 'menu-click');
																html?.removeAttribute('data-vertical-style');

															  }
															}
															if (localStorage.getItem('spruha-page-mode')) {
															  const type: any = localStorage.getItem('spruha-page-mode');
															  html?.setAttribute('data-page-style', type);
															}
															if (localStorage.getItem('spruha-width-mode')) {
															  const type: any = localStorage.getItem('spruha-width-mode');
															  html?.setAttribute('data-width', type);
															}
															if (localStorage.getItem('spruha-menu-position')) {
															  const type: any = localStorage.getItem('spruha-menu-position');
															  html?.setAttribute('data-menu-position', type);
															}
															if (localStorage.getItem('spruha-menu-mode')) {
															  const type: any = localStorage.getItem('spruha-menu-mode');
															  html?.setAttribute('data-menu-styles', type);
															}
															if (localStorage.getItem('spruha-header-position')) {
															  const type: any = localStorage.getItem('spruha-header-position');
															  html?.setAttribute('data-header-position', type);
															}
															if (localStorage.getItem('spruha-header-mode')) {
															  const type: any = localStorage.getItem('spruha-header-mode');
															  html?.setAttribute('data-header-styles', type);
															  if(type =="light"){
																const lightHeader = document.getElementById(
																  'switcher-header-light'
																) as HTMLInputElement;
																if (lightHeader) {
																  lightHeader.checked = true;
																}
															  }
															}

															if (localStorage.getItem("spruha-background-mode-body")) {
															  const bodytype: any = localStorage.getItem("spruha-background-mode-body")
															  const bodytype1: any = localStorage.getItem("spruha-background-mode-body1")
															  const darktype: any = localStorage.getItem("spruha-background-mode-dark")
															  const lighttype: any = localStorage.getItem("spruha-background-mode-light")
															  const formtype: any = localStorage.getItem("spruha-background-mode-formcontrol")
															  const inputtype: any = localStorage.getItem("spruha-background-mode-inputBorder")


															  const event: any = localStorage.getItem("spruhadarktheme");
															  html?.style.setProperty('--body-bg-rgb', bodytype);
															  html?.style.setProperty('--body-bg-rgb2', bodytype1);
															  html?.style.setProperty('--sidemenu-active-bgcolor', darktype);
															  html?.style.setProperty('--light-rgb', lighttype);
															  html?.style.setProperty('--form-control-bg', formtype);
															  html?.style.setProperty('--input-border', inputtype);


															  html?.setAttribute("data-theme-mode", event);
															}
															if (localStorage.getItem("bodyBgRGB")) {
															  const bodytype: any = localStorage.getItem("bodyBgRGB")
															  const darktype: any = localStorage.getItem("bodyBgRGB2")
															  const lighttype: any = localStorage.getItem("bodylightRGB")
															  const inputbordertype: any = localStorage.getItem("inputBorder")

															  const formtype: any = localStorage.getItem("spruhalight-background-formcontrol")


															  html?.style.setProperty('--body-bg-rgb', bodytype);
															  html?.style.setProperty('--sidemenu-active-bgcolor', darktype);
															  html?.style.setProperty('--light-rgb', lighttype);
															  html?.style.setProperty('--input-border', inputbordertype);
															  html?.style.setProperty('--form-control-bg', formtype);

															  html?.classList.add('dark');
															}
															if (localStorage.getItem("bodylightRGB")) {
															  const bodytype: any = localStorage.getItem("bodyBgRGB")
															  const darktype: any = localStorage.getItem("bodyBgRGB2")
															  const lighttype: any = localStorage.getItem("bodylightRGB")
															  const formtype: any = localStorage.getItem("spruhalight-background-formcontrol")
															  html?.style.setProperty('--body-bg-rgb', bodytype);
															  html?.style.setProperty('--sidemenu-active-bgcolor', darktype);
															  html?.style.setProperty('--light-rgb', lighttype);
															  html?.style.setProperty('--form-control-bg', formtype);
															  html?.classList.add('dark');
															}
															if (localStorage.getItem("bodyBgRGB2")) {
															  const bodytype: any = localStorage.getItem("bodyBgRGB")
															  const darktype: any = localStorage.getItem("bodyBgRGB2")
															  const lighttype: any = localStorage.getItem("bodylightRGB")
															  const formtype: any = localStorage.getItem("spruhalight-background-formcontrol")
															  html?.style.setProperty('--body-bg-rgb', bodytype);
															  html?.style.setProperty('--sidemenu-active-bgcolor', darktype);
															  html?.style.setProperty('--light-rgb', lighttype);
															  html?.style.setProperty('--form-control-bg', formtype);
															  html?.classList.add('dark');
															}
															if (localStorage.getItem("spruhaMenu")) {
															  const type1: any = localStorage.getItem("spruhaMenu");
															  html?.setAttribute("data-nav-style", type1);
															  const type: any = localStorage.getItem('spruhaMenu-toggled');
															  html?.setAttribute('data-toggled', type);
															}
															if (localStorage.getItem("spruhaverticalstyles")) {
															  const type1: any = localStorage.getItem("spruhaverticalstyles");
															  html?.setAttribute("data-vertical-style", type1);
															  const type: any = localStorage.getItem('spruhaverticalstyles-toggled');
															  html?.setAttribute('data-toggled', type);
															  if (localStorage.getItem('data-vertical-style') == type1) {
																html?.setAttribute('data-toggled', type);
															  } else {
																const type1: any = localStorage.getItem('spruhaverticalstyles-toggled');
																document.querySelector('html')?.setAttribute('data-toggled', document.querySelector(".slide.open")?.classList.contains("has-sub") ? type1 : 'double-menu-close');

															  }
															}
															if (localStorage.getItem("spruha-image")) {
															  const type: any = localStorage.getItem("spruha-image");
															  html?.setAttribute('data-bg-img', type);
															}

															if (localStorage.getItem("spruha-primary-mode")) {
															  const type: any = localStorage.getItem("spruha-primary-mode");
															  html?.style.setProperty('--primary-rgb', type);
															  localStorage.removeItem("spruhalight-primary-color")
															}

															if (localStorage.getItem("spruhalight-primary-color")) {
															  const type: any = localStorage.getItem("spruhalight-primary-color");
															  html?.style.setProperty('--primary-rgb', type);
															}
															if (localStorage.getItem("spruhalight-primary-color1")) {
															  const type: any = localStorage.getItem("spruhalight-primary-color1");
															  // html?.style.setProperty('--primary-rgb', type);
															  html?.style.setProperty('--primary', type);
															}
														  }
Step2:
To remove complete LocalStorage saving you need to remove
all localstorage related calling functions in
switcher.ts
src\app\shared\components\switcher\switcher.tsfile.
LocalStorage related functions like localStorage.setItem, localStorage.removeItem, localStorage.getItem, localStorage.clear. Below are the some examples to find out.
localStorage.setItem( );
localStorage.removeItem( );
localStorage.getItem( )
localStorage.clear();
localStorageBackup();
Disabling Switcher
How To Disable Switcher In All Pages ?
Step1:
Open header.component.html file
src\app\shared\componets\header\header.component.html
To remove switcher icons remove below code shown in header.component.html file
<!-- Start::header-element -->
	<div class="header-element">
		<!-- Start::header-link|switcher-icon -->
			<a href="javascript:void(0);" class="header-link switcher-icon" data-bs-toggle="offcanvas" data-bs-target="#switcher-canvas" (click)="SwicherOpen()">
				<i class="fe fe-settings header-link-icon"> </i>
			</a>
		<!-- End::header-link|switcher-icon -->
	</div>
<!-- End::header-element -->
Step2:
After removing code in header.component.html page remove switcher.component.html partial link shown below in every html page
  //primary theme change
  public dynamicLightPrimary(data: any): void {
    this.color1 = data.color;

    const dynamicPrimaryLight = document.querySelectorAll(
      'input.color-primary-light'
    );

    switcher.dynamicLightPrimaryColor(dynamicPrimaryLight, this.color1);

    localStorage.setItem('spruhalight-primary-color', this.color1);
    localStorage.setItem('spruhalight-primary-hover', this.color1);
    localStorage.setItem('spruhalight-primary-border', this.color1);
    localStorage.setItem('spruhalight-mode', 'true');
    this.body?.classList.remove('transparent-mode');

    // Adding
    this.body?.classList.add('light-mode');

    // Removing
    this.body?.classList.remove('dark-mode');
    this.body?.classList.remove('bg-img1');

    // removing data from session storage

    switcher.checkOptions();

  }
  reset() {
    localStorage.clear();
    const html: any = document.querySelector('html');
    html.style = '';
    html.setAttribute('class', 'light');
    html.setAttribute('dir', 'ltr');
    html.setAttribute('data-nav-layout', 'vertical');
    html.removeAttribute('data-page-style', 'regular');
    html.removeAttribute('data-width', 'full-width');
    html.removeAttribute('data-menu-position', 'fixed');
    html.removeAttribute('data-header-position', 'fixed');
    html.setAttribute('data-header-styles', 'light');
    html.setAttribute('data-menu-styles', 'dark');
    html.removeAttribute('bg-img', 'dark');
    html.setAttribute('data-vertical-style', 'overlay');
    html.removeAttribute('toggled', 'overlay');

    const overlay = document.getElementById(
      'switcher-default-menu'
    ) as HTMLInputElement;
    overlay.checked = true;
    const menuclickclosed = document.getElementById(
      'switcher-menu-click'
    ) as HTMLInputElement;
    menuclickclosed.checked = false;
    const menuhoverclosed = document.getElementById(
      'switcher-menu-hover'
    ) as HTMLInputElement;
    menuhoverclosed.checked = false;
    const iconclickclosed = document.getElementById(
      'switcher-icon-click'
    ) as HTMLInputElement;
    iconclickclosed.checked = false;
    const iconhoverclosed = document.getElementById(
      'switcher-icon-hover'
    ) as HTMLInputElement;
    iconhoverclosed.checked = false;

    switcher.checkOptions();
  }
  public localDark = localStorage;
  public localRtl = localStorage;
  public localHorizontal = localStorage;
  public localMenu = localStorage;
  public localClassic = localStorage;
  public localBoxed = localStorage;
  public localScrollable = localStorage;
  public localFixed = localStorage;
  public localOverlay = localStorage;

  ngOnInit(): void {
    switcher.localStorageBackUp();
  }
How To Remove Switcher In Landing Page ?
Step1:
Remove below shown code in head part of the landing.html file Path:src\app\components\page\landing\landing.component.html
														<button (click)="toggleSwitcher()"
														class="btn btn-icon btn-primary"
														data-bs-toggle="offcanvas"
														data-bs-target="#switcher-canvas">
														<i class="fe fe-settings align-middle">
														</button>