Synto - Tailwind Angular Admin Template
FAQ'S
General Style
How to Change Font Style ?
Step 1:
Go To style.scss (src/assets/scss/styles.scss )
if you want to change another font-family Go to the site Google Fonts And Select One font Family and import in to styles.scss file
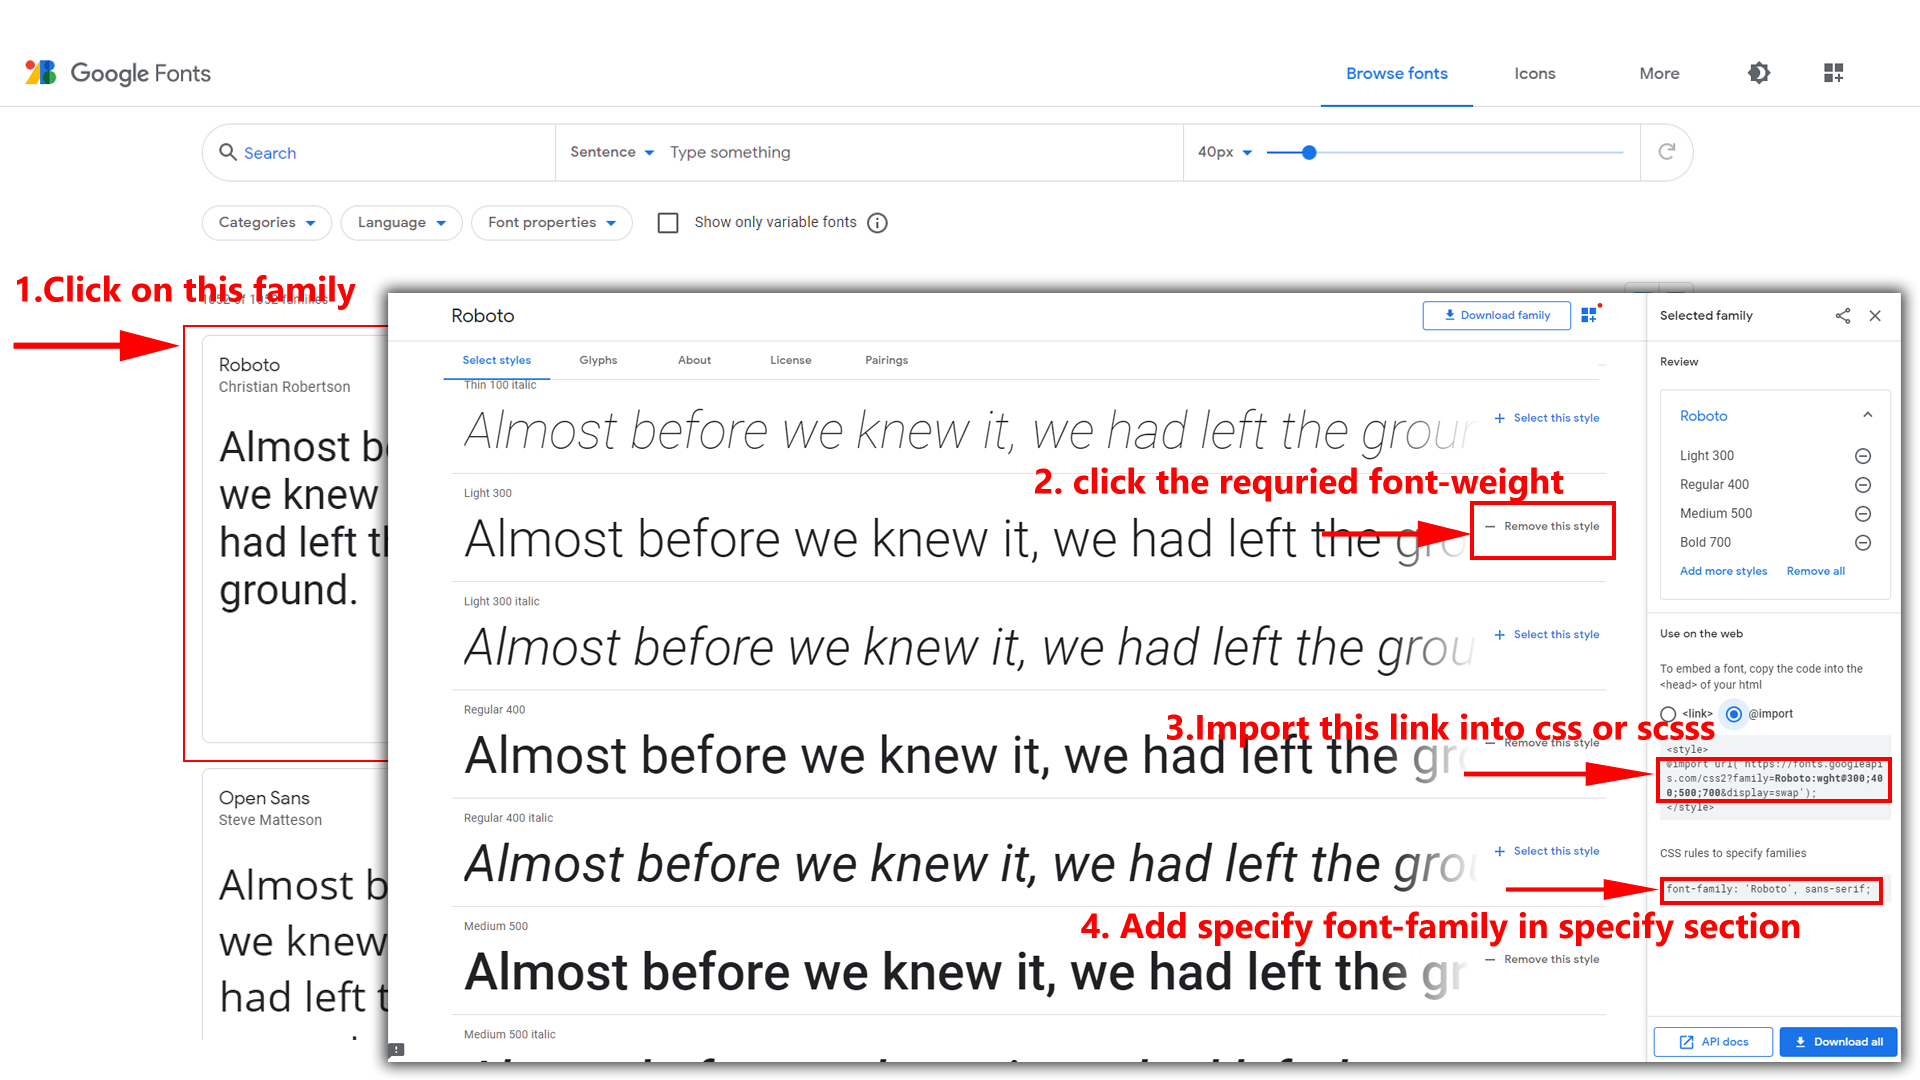
How to Select font Family
Example:
Step 2:
And paste Your Selected font-family in style.scss
Example:

Step 3:
And add the Your Selected font-family in tailwind config file inplace of old font
Example:
fontFamily: {
	inter: ["Inter", "sans-serif"], //place your font here
},
Step 4:
And add the Your Selected font-family to body that is font-inter in custom.scss file (rootpath :- assets/scss/tailwind/_custom.scss) file inplace of old font
Example:
body {
 @apply bg-bodybg h-full text-gray-600 dark:text-white m-0 font-inter font-normal text-sm relative;
}
How to Add Menus to Sidebar
In your Angular project, you can easily add menus to the sidebar by modifying the MENUITEMS array in the navservice.ts (src\app\shared\services\navservice.ts) file. The sidebar will dynamically display the menus based on the contents of this array.
Step 1 :
To add the parent Menu Items:
Path:src\app\shared\services\navservice.ts and go through
Inside the MENUITEMS array, you can add your menu items using the following format:
{
		title: 'Your Menu Title',
		icon: 'icon-name',
		type: 'link', // or 'sub', 'mega-menu', 'external', 'empty'
		path: '/path-to-route', // Specify the route path for link type
		active: false,
		Menusub: true,
		badgeClass: 'badge-class', // (optional) Add a badge to the menu item
		badgeValue: 'Badge Text', // (optional) Text to display in the badge
	 }
To add the children Menu Items:
Inside the MENUITEMS array, you can add your menu items using the following format:
{
	title: 'Your Menu Title',
	icon: 'icon-name',
	type: 'link', // or 'sub', 'mega-menu', 'external', 'empty'
	active: false,
	badgeClass: 'badge-class', // (optional) Add a badge to the menu item
	badgeValue: 'Badge Text', // (optional) Text to display in the badge
	children: [
	 // (optional) Define child items for sub-menu or mega-menu type
	 {
	   path: '/child-path',
	   title: 'Child Menu Title',
	   type: 'link',
	 },
	 // Add more child items if needed
   ],
}- title: The display name of the menu.
- icon: The icon to display next to the menu.
- type: Specify the type of the menu item (link, sub, mega-menu, external, empty).
- path: Specify the route path for link type menu.
- Menusub: Set to true for sub-menu or mega-menu types.
- active: Set to true to mark this menu as active.
- badgeClass (optional): CSS class for the badge.
- badgeValue (optional): Text to display in the badge.
- children: Define an array of child menu items for sub-menu or mega-menu type.
3 . Save the Changes:
After adding your menu items, save the changes made to the nav.service.ts (src\app\shared\services\navservice.ts) file.
4 . View Sidebar Changes:
he sidebar will now automatically display the added menu items based on the modifications you made in the MENUITEMS array.
How to Change Logo ?
Go To "src/assets/img/brand-logos" folder and replace your logo with Previous Logos within in image size. note: Please don't increase logo sizes. Replace your logo within given image size. otherwise the logo will not fit in particular place it disturbs the template design.
To clear LocalStorage(cookie)
How to clear LocalStorage (cookie)?
Step1:
Open switcher.ts file
src\app\shared\components\switcher\switcher.ts
To clear LocalStorage loading functions you need to remove localStorageBackup(); function in switcher.ts as shown below
export function localStorageBackUp() {
 ...
}
Step2:
To remove complete LocalStorage saving you need to remove
all localstorage related calling functions in
switcher.ts
src\app\shared\components\switcher\switcher.tsfile.
LocalStorage related functions like localStorage.setItem, localStorage.removeItem, localStorage.getItem, localStorage.clear. Below are the some examples to find out.
localStorage.setItem( );
localStorage.removeItem( );
localStorage.getItem( )
localStorage.clear();
localStorageBackup();
Disabling Switcher
How To Disable Switcher In All Pages ?
Step1:
Open header.html file
src\app\components\page\landing\landing.component.html
To remove switcher icons remove below code shown in landing.component.html file
<div class="switcher-icon">
<button
aria-label="button"
type="button"
class="hs-dropdown-toggle inline-flex flex-shrink-0 justify-center items-center gap-2 h-[2.375rem] w-[2.375rem] rounded-full font-medium bg-gray-100 hover:bg-gray-200 text-gray-500 align-middle focus:outline-none focus-visible:outline-none focus:ring-0 focus:ring-gray-400 focus:ring-offset-0 focus:ring-offset-white transition-all text-xs dark:bg-bgdark dark:hover:bg-black/20 dark:text-white/70 dark:hover:text-white dark:focus:ring-white/10 dark:focus:ring-offset-white/10"
data-hs-overlay="#hs-overlay-switcher">
<i class="ri-settings-5-line header-icon animate-spin">
</button>
</div>
Note : After completing above steps please run gulp command to update src folder.
How To Remove Switcher In Landing Page ?
Step1:
Remove below shown code inapp-landing of landing.component.html file Path:src\app\components\page\landing\landing.component.html
		<a
		aria-label="anchor"
                  href="javascript:void(0);"
                  class="ti-btn m-0 p-2 px-3 ti-btn-secondary"
                  data-hs-overlay="#hs-overlay-switcher">
		<i class="ri-settings-2-line animate-spin">